Showing posts with label reno. Show all posts

7.19.2011

Main Bathroom Makeover

Last week I shared with you my master bathroom makeover/reno.  Mr. D and I had SO much fun that we decided to renovate our main bathroom too.  It had some of the same challenges as the master bathroom...


- lowered ceiling above the bathtub/shower.  Instead of cozy, the shower felt like a cave in spite of the white tile.

- a tub that didn't drain well.  Ok, so we probably could have fixed it or something but hey, this was my chance...bring on the soaker tub!!

- towel rack attached inside the shower stall


- pressboard with fake laminate wood vanity

I think the dog had even chewed on the corner when he was a puppy.  This bad boy vanity had seen better days and there was no salvaging it!


You can see how small the bathroom is in the first photo.  Everything is pretty much right beside each other so we wanted to try to make it feel a little more spacious even if we couldn't actually add square footage.


We created the feeling of space by putting white subway tile in the tub/shower surround all the way to the ceiling.  That not only draws the eye upward giving the illusion of height but also reflects light from the window into the space.  It actually gives this space the best natural light in the whole house.


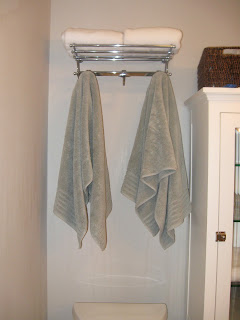
We switched out the vanity with a pedestal sink to add to the feeling of more space.  We were mindful of storage space so we added a train rack to hold towels, a double towel rack across from the sink and a glass shelf under the mirror for toothbrushes and other essentials.  The pedestal sink also has a wide flat ledge around it perfect for holding a soap pump or hand towel.

I can't believe I almost forgot my FAVOURITE part of this remodel...it's definitely the soaker tub complete with adjustable jets.  Mr. D had some specific wants for the master bath so it was my turn to dream big.  We had to replace the old tub because it was not draining well and since everything was torn out already we decided to go for the soaker tub!  I was worried that it would be too long but we squeezed it in with NO space to spare!  Literally...no extra space at all!

Now guests feel like they are at the spa whenever they come to visit.  Wait...now I feel like I'm at the spa!  Heavenly!


Not the best shot but you get the idea.


We had a great time making this our other dream bathroom come true!  Ok, so it may not be my ULTIMATE dream bathroom but it's pretty special in it's own right!  I am excited to continue the remodeling we started three years ago!


7.12.2011

Hotel Bathroom Redo - Finished

So, I finally got around to taking those after photos of our bathroom remodel.  Here's a little reminder of what it looked like before.
Wasn't it beautiful? Uh...not so much!


And after...


Before...


After...


Before...


After...
There you have it!  We had a blast making this space our own!  Check out this post for more before and after photos.  Happy renovating.


6.13.2011

Hotel Bathroom Redo

A few years before we got married, Mr. D had the foresight to buy a smallish 1500 sq ft house.  He got it at a great price but it needed some TLC.  It is a very typical Florida box with very little character at all.  Not only that, but the updates that the previous owners did were completed to less-than-excellent standards.  Once I entered the picture we decided to start giving our little diamond in the rough the TLC it so deserved.  We decided to start with the most needy of rooms...the two bathrooms.  Here is the a pic of the charming hotel-style master bathroom we started with.

Standing in master bedroom,
toilet and shower to the right
See the teeny tiny vanity?
Shower is opposite the sink
Standing in the office,
looking into the master bath

Where to begin with what was wrong with this master bath!  

1.  Layout - it was definitely giving off the hotel vibe but not the kind of hotel we were going for.  The drop ceiling made it feel like a cave.

2.  Vanities - particle board covered in fake wood laminate.  'Nuff said.

3.  Doorway into the office - we think it was for a nursery but we never used that door so it was eating valuable space. 

I could go on and on...peach flooring, sliding shower door...but I'll spare you the yucky details.  

We had a wonderful contractor since this was WAY beyond our weekend warrior capabilities.  He helped us make our dreams a reality!  


Inspiration came from many places - magazines etc but the most exciting place was from the bathroom we had at our honeymoon hotel.  Of course I can't find the picture of it right now but it was bee-you-tee-ful!

Here is the finished product (sort of, not sure where the photos are with everything complete)...after 3 months of work it all came together.

 We framed in the bathroom entrance and put double doors with frosted glass - totally LOVE how it turned out!  You can see how close the bathroom is to our bed.  The doors have stationary handles and there is a rollerball system at the top of each door that keeps them closed.


 The vanity was one of my favourite changes.  We took a little space from the shower stall to make room for a double vanity.  We took down the walls dividing the shower/toilet from the rest of the bathroom and closed in the door that lead to the office.  The counter top is Cambria, a man-made composite that looks like stone but doesn't need any maintenance.  LOVE IT!  The light fixtures, mirrors (not shown) and towel hook (also not shown) were Restoration Hardware splurges during their bed & bath annual sale.  They were also discontinued so we got an even better deal!  I'll take an updated pic with all of the finished pieces soon.
You can see the back splash of the vanity in the bottom left corner of the picture.  We took off some of the length of the shower stall, widened it a bit and made the enclosure half glass. We really wanted to give the small bathroom the feeling of space and using glass did the trick!  Mr. D's one requirement was that our new shower have body sprays.  Let me tell ya...they are heavenly!  My dream was to have a true rain shower head...boy are they all they're cracked up to be!  We added white subway tile all the way to the ceiling in the shower stall and mosaic-type tiles on the shower floor.
Closing in the door to the office gave us enough room to shift the shower footprint and make a double vanity.  It was SO worth it!  We removed the second teeny, tiny vanity and put a cabinet for storage in it's place.  Also not shown is the towel holder train rack that sits above the toilet for extra towel hanging space.  I'll get a pic of that later too.  Oh, and we changed out the tile flooring for something a little more neutral.  


We are so happy with the results and three years later we are still enjoying everything so much!  We sure had some snags along the way (somehow our window got broken, the plumber did the painting and it had to be redone ... ) but it was worth it!


I'll share the other bathroom update later but I'll leave you with two words - soaker tub!  


...one more thing... I learned through our reno that if you really want something you need to speak up and stick to your guns because it will be worth it in the end.